Unity3D入门教程 - 阿发

Unity3D入门教程 - 阿发
Ramsayi第 01 章 课程介绍
课程介绍
Unity ,一款 3D 游戏引擎。
常见的游戏引擎:
- Unity ( C# )
- Unreal Engine ( C ++ )
- Cocos Creator ( JavaScript )
- Frostbite Engine、Source Engine、Cry Engine …
游戏引擎 VS 建模
游戏建模:创建游戏 模型 ,面向美术人员
游戏引擎:驱动 游戏逻辑 ,面向开发人员
CG 建模软件:3Dmax、Maya、Blender 、Cinema4D、ZBrush …
资源下载
第 02 章 开发环境
需要许可证才能使用,直接添加一个免费的个人版许可证即可。
第 03 章 场景与视图
场景
Scene,即游戏中的一处 关卡 \ 场景
默认场景中,只有一个主摄像机和平行光源
游戏物体
GameObject,游戏中的任何角色、道具、建筑
3D 视图
了解 3D 视图的操作。
导航器 Gizmo,表示世界坐标的方向栅格 Grid,表示 XZ 坐标平面天空盒 Skybox,表示游戏世界的背景
视图相关操作
平移:鼠标中键
头部旋转:鼠标右键
旋转中心旋转:ALT + 鼠标左键
修改旋转中心:鼠标中键
缩放:鼠标滚轮
导航器相关操作
重置方向:Shift + 鼠标左键中心方块
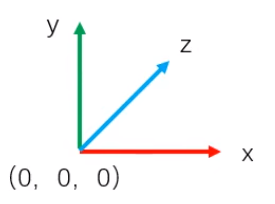
世界坐标系
3D 游戏世界的坐标系(左手系)
视野中心
框显所选
选中一个物体
按F键,置于视图中心
此时旋转视图,似是绕着物体旋转。
透视与正交
透视视图Perspective, 近大远小
正交视图Orthographic, 又称等距视图Isometric
透视图下,物体‘近大远小’。正交视图下,物体的显示与距离无关
第 04 章 游戏物体
3D 原生物体
Cube ,立方体
Sphere ,球体
Capsule ,胶囊体
Cylinder ,圆柱体
Plane ,平面
物体的移动
Move Tool ,移动工具
Rotate Tool ,旋转工具
Scale Tool ,缩放工具
旋转与缩放
Rotate Tool ,旋转工具
演示:选中一个物体,绕 Z 轴旋转。
其中,
逆时针为正,顺时针为负
可以在 Inspector 里精确指定
按住 CTRL 键时,角度增量为 15 度
Edit | Grid and Snap Settings 栅格吸附设置
1 可以用快捷键 W 、E 、R 切换
2 操作模式,保持默认
- Pivot 轴心 / Center 中心点
- Global 世界坐标系 / Local 局部坐标系
多选复制对齐
1 多选
按 CTRL 或 SHIFT 键,点选
在 3D 视图中,鼠标 框选
2 复制
选中物体,
CTRL + D复制物体右键 Duplicate
3 聚焦
选中物体,按 F 键 ,置于视图中心
或者 双击 物体
4 激活
- Active 选中物体,在检查器中 激活 / 禁用 物体
5 对齐
对初学者,直接 目视对齐 即可
进入 正交顶视图 / 正交右视图 / 正交后视图 ,方便观察
练习
练习,使用基本体做一个简单造型。
AF 扩展插件
AF 扩展插件 ,AfSimpleExtension.cs
相关功能:
获取物体的尺寸
置于视图中心,
G键切换到 正交顶视图,
1键
第 05 章 模型
网格
网格Mesh,存储了模型的形状数据
- 模型的形状,由若干个小面围合而成
- 模型是中空的
- Mesh 中包含了面、顶点坐标、面的法向等数据
材质
材质Material,.定义了物体的表面细节
- 颜色
- 金属/非金属
- 光滑/粗糙
- 透明/半透明/不透明
- 凹陷/凸起
纹理
纹理Texture,也称贴图,用一张图定义物体的表面颜色
外部模型
Unity 支持各种 CG 建模软件:3Dmax/Maya/Blender/Cinema4D/ZBrush,.
标准模型格式:FBX
在建模软件中,将模型导出为 FBX 格式即可。
更多细节
模型没有厚度,正面可见,背面透明
物体具有默认材质 Default-Material,否则显示为紫色
FBX 的使用
在一个 FBX 模型文件中,一般包含:
Mesh网格,定义物体的形状Material材质,定义表面的光学特性Texture贴图,定义表面的像素颜色
FBX 第一种使用方式:
演示:
- 选择
*.fbx文件,直接拖到层级窗口 - 观察节点图标
- 选中节点,观察 Inspector 中的操作按钮
贴图,
- 有的模型需要贴图文件
- 贴图文件的路径是约定好的
- 与 fbx 相同目录,或者同级
Textures目录
材质,
- 有的模型定义了多个材质
- 在 Materials 属性中定义了一个数组
FBX 的使用(二)
FBX 第二种使用方式:材质替换
演示:材质的重映射 Remap
选中*.fbx 资源文件
在 Inspector 中切到 Materials 属性
Use Embeded MaterialsOn Demand Remap: 映射新的材质点
Apply应用设置
FBX 的使用(三)
FBX 第三种使用方式:分解重组
演示:
- -选择 fbx 中的 网格
- -选择 bx 中的 材质,或者自定义一个材质
- -如果存在贴图,则使用 x 配套的贴图文件
第 06 章 资源文件
资源文件
Assets目录下的文件,称为资源
常见类型:
- 模型文件 Model(
*.fbx) - 图片文件 Texture(*
jpg/png psd/tif) - 音频文件 AudioClip(*
.mp3/wav/aif) - 脚本文件 Script(
*.cs) - 材质文件*
.mat,场景文件*.unity。。
Meta,描述文件
每一个资源文件/文件夹,都对一个*.meta描述文件
场景文件
场景文件*unity,记录了场景中的节点数据
包含:
- 场景全局设置
- 节点
- 节点下的组件
- 每个组件的参数值
资源包
资源包Unity Package,即对 Assets 下的资源打包
演示:
- -选择一个资源文件,或者一个目录
- -右键,
Export Package - -生成*.unitypackage 资源包
Unity 资源商店
第 07 章 父子关系
轴心
轴心Pivot,指一个物体的操作基准点
演示:
- 移动一个物体
- 旋转一个物体
- 对于基本体来说,轴心点默认位于几何中心
父子关系
父子级,指两个物体之间的关系。
在 Hierarchy 窗口中,
- 拖动物体 B,到物体 A 下
- 子物体会随着父物体一并移动
- 删除父物体时,子物体一并删除
相对坐标:子物体的坐标,是相对于父物体的。
移动父物体时,观察子物体的坐标。。
空物体
空物体EmptyObject,即空对象、空节点。
演示:
- 添加一个空物体
- 空物体不可见,(没有网格)
- 空物体也有坐标,可以移动
空物体很常见,其作用:
- -用于节点的组织和管理
- -用于标记一个位置
要点与细节
GameObject,其实是一个节点/容器
一般所谓的‘物体’,即有形状的东西,对应的 Mesh
Global 与 Local
Global,即世界坐标系- -以世界中心为轴
- -6 个方向代表:上下东西南北
Local,即本地坐标系- -以物体自身为轴
- -6 个方向代表:上下前后左右
y 轴称为up,z 轴称为forward,x 轴称为right
一般地,要求模型的正脸与 Z 轴方向一致
Pivot 与 Center
Pivot,轴心Center,几何中心
一般来说,物体的轴心并不在几何中心处
第 08 章 组件
组件
组件Component,代表一个功能
例如,
Light,光源Mesh Filter,网格过滤器Mesh Renderer,网格渲染器。。
添加删除组件
几个组件操作:
Add Component,添加一个组件
Remove Component,删除一个组件
练习:Mesh Filter 和 Mesh Renderer 组件。
- 添加一个空物体
- 添加
Mesh|Mesh Filter,加载网格数据 - 添加
Mesh|Mesh Renderer,渲染网格
AudioSource 组件
AudioSource组件,用于播放音乐/音效
- 添加一个音乐文件,*.mp3/wav/aiff
- 创建一个物体
- Add Component, Audio | Audio Source
- 将音乐文件拖到 AudioSource.AudioClip 属性
- 在 3D 窗口上方,选 Toggle Audio On
Transform 组件
Transform,称为变换组件。
物体的基本参数:
Position,位置(相对坐标)Rotation,旋转(欧拉角)Scale,缩放
Transform 组件的特点:
- 1 所有物体都有
- 2 不能被删除
摄像机
摄像机Camera,负责拍摄游戏画面。
演示:
- 1 调整窗口布局,
Scene/Game并排显示 - 2 选中摄像机,观察镜头范围
- 3 摄像机的 Z 轴指向,即为拍摄方向
- 4 拍到的画面,呈现在 Game 窗口中
Game 窗口中的画面,即为玩家最终所见画面
调整摄像机的角度,两种方法:
- 1 手工移动、旋转摄像机,对准目标
- 2 Align with View,与 3D 视图对齐
- 先在 3D 视图里摆好角度,此为观察者视角
- 然后选中 Main Camera,执行 Align with View
此时,摄像机视角与观察者视角完全相同
第 09 章 脚本
脚本
文件名即为类名 。如 SimpleLogic
当前物体
在 SimpleLogic.cs 中,获取当前物体
this,当前脚本组件this.gameObject,当前物体this.gameObject.name,当前物体的名字this.gameObject.transform,当前物体下的 Transform 组件
为了简化书写,也可写作this.transform,效果相同
1 | GameObject obj = this.gameObject; |
物体的坐标
物体的坐标,
transform.position,世界坐标transform.localPosition,本地坐标
一般常使用的是 localPosition,与 Inspector 中的值一致
1 | Transform tr = transform; |
Vectors3 类型,即三维向量,含 x y z 三个分量(float)
设置物体的坐标:
1 | transform.localPosition = new Vector3(1.5f, 0, 2.0f); |
其中,float 型的数值,在书写时应以 f 结尾
播放模式
Edit Mode,编辑模式Play Mode,播放/运行模式
在播放模式下,
- 实时显示场景中的物体和属性
- 游戏中的状态不可保存
You must exit play mode to save the scene
第 10 章 帧更新
帧更新
Frame,一个游戏帧FrameRate,帧率/刷新率FPS,Frames Per Sencond,每秒更新多少帧
Update(),称为帧更新
此方法会被游戏引擎定时调用,以更新游戏的状态
演示:在 Update()中添加日志输出,在 Console 中观察。。
帧率观察:
Time.time,游戏时间Time.deltaTime,距上次更新的时间差
显然,帧率是不固定的,Unity 会尽量较快地更新
1 | Debug.Log("帧更新:" + Time.time); |
Unity 不支持固定帧率,但可以设定一个近似帧率
1 | Application.targetFrameRate = 60; |
其中,指示 Unity 尽量以 FPS=60 的帧率更新游戏
移动物体
在 Update()中,移动物体的位置
例如,
1 | Vector3 pos = transform.localPosition; |
运行游戏,则物体沿 X 轴正向移动
物体的运动并不是匀速的。
每次运动 0.01 米,但是间隔的 deltaTime 不固定
比如,
第 1 次,deltaTime=0.016 秒,运动 0.01 米
第 2 次,deltaTime=0.030 秒,运动 0.01 米。
匀速运动
使用deltaTime,让物体的匀速运动
例如,
1 | float speed = 3; |
第 11 章 物体的运动
物体的运动
本章研究物体的运动。
- 1 布置测试场景
- 2 添加小火车
- 3 添加脚本
SimpleLogic,控制小火车的运动
修改 position/localPosition,可以让物体运动
例如,
1 | Vector3 pos = transform.localPosition |
此时,小车向正北(+Z)方向运动
一般使用transform.Translate(),实现相对运动
1 | transform.Translate(dx,dy,dz,.) |
其中,dx,dy,dz 是坐标增量
例如,
1 | transform.Translate(O, O, distance); //Z方向增加distance |
相对运动
transform.Translate(),可以实现物体的运动
1 | transform.Translate(dx, dy, dz, space); |
其中,第 4 个参数:Space.World,相对于世界坐标系Space.Self,相当于自身坐标系(本地坐标系)
要点与细节
在建模时,要求物体的脸的朝向与物体+Z轴一致
运动的方向
运动的方向,使物体朝着目标方向运动
演示:添加一个红旗,作为目标。。
获取目标物体
1
GameObject flag = GameObject.Find("红旗");
转向目标
1
transform.LookAt(flag.transform);
向‘前’运动,forward,+Z 方向
1
transform.Translate(0, 0, dz, Space.Self);
其中,GameObject.Find(name_or_path),根据名字/路径来查找物体transform.LookAt(target),使物体的 Z 轴指向物体Space.self,沿物体自身坐标系的轴向运动
小练习
练习:小火车朝向目标运动,到达目标后停止。
向量测距:
1 | p1 = 火车.transform.position |
第 12 章 物体的旋转
物体的旋转
给物体调转一个旋转角度。
Quaternion 四元组(x,y,z,w)
1
transform.rotation=…不便操作,官方不建议使用
https://docs.unity3d.com/cn/2023.2/ScriptReference/Quaternion.html
欧拉角 Euler Angle
1
2transform.eulerAngles = new Vector3(0, 45, 0);
transform.localEulerAngles = new Vector3(0, 45, 0);
在 Update()修改角度,持续旋转
1 | Vector3 angles = transform.localEulerAngles; |
优化,使之匀速旋转,
1 | float rotateSpeed = 30; //每秒转30度角 |
相对旋转
Rotate(),旋转一个相对角度
1 | transform.Rotate(dx, dy, dz, space); |
相当于,
1 | Vector3 angles = transform.localEulerAngles; |
自转与公转
自转,绕着自身轴旋转。
公转,围绕另一个物体旋转。
当父物体转动时,带动子物体一并旋转。
1 | // 找到父物体 |
官方文档
https://docs.unity3d.com/cn/2023.2/ScriptReference/index.html
第 13 章 脚本的运行
脚本的运行
场景的加载过程:
创建节点
1
GameObject node = new GameObject()
实例化组件
1
MeshRenderer comp = new MeshRenderer()
实例化脚本组件
1
SimpleLogic script1 = new SimpleLogic()
调用事件函数
- 初始化
script1.Start() - 帧更新
script1.Update()
- 初始化
注意,Unity 是一个纯面向对象的框架,对象由框架创建
消息函数
所有的脚本,一般应继承于MonoBehaviour消息函数,或称事件函数,一些回调函数
https://docs.unity.cn/cn/current/ScriptReference/MonoBehaviour.html
常见的消息函数:
Awake,初始化,仅执行一次Start,初始化,仅执行一次Update,帧更新,每帧调用一次OnEnable,每当组件启用时调用OnDisable,每当组件禁用时调用
其中,Awake先于 Start 调用Awake总是调用,即使组件被禁用Start,只执行一次,第一次启用时调用
对于初学者,使用 Start 来初始化即可。
已禁用的组件,其消息函数Start/Update不会被调用Awake/Start,都只会执行一次
脚本执行顺序
消息函数的调用顺序:
第 1 阶段初始化,
script1.Awake(), script2.Awake(),..
第 2 阶段初始化,
script1.Start(), script2.Start(),..
帧更新,
script1.Update(), script2.Update(),..
脚本的优先级 Script Execution Order
默认地,所有脚本的优先级为 0,无特定顺序
优先级的设定:
- 选中一个脚本,打开 Execution Order 对话框
- 点+按钮,添加一个脚本
- 指定优先级,值越小、优先级越高
或者,直接拖动调节顺序
要点与细节
- 脚本的执行顺序,和 Hierarchy 中的层级顺序无关
- 一般地,并不需要显式设置 Execution Order,默认即可
主控脚本
主控脚本,即游戏的主控逻辑。
演示:添加一个脚本MainLogic,作为主控脚本。。
1 | Application.targetFrameRate = 60; |
第 14 章 脚本的参数
脚本的参数
脚本的参数,用于控制脚本组件的功能。
修改 RotateY.cs,添加一个参数。。
1 | public float rotateSpeed=30f; |
参数的用法:
参数必须为
public,才可以在检查器中显示参数的名称即变量名
rotateSpeed→Rotate Speed参数的默认值,即变量的默认值
可以Reset菜单重置参数的工具提示,可以用
[Tooltip()]指定1
[]
1 | [ Tooltip("这个是Y轴向的角速度") ] |
参数的赋值
脚本参数的赋值(以下按时间顺序)
定义默认值
1
public float rotateSpeed = 30f;
在检查器中赋值
1
script.rotateSpeed = 180f; //由Unity框架对参数赋值
在 Awake 中初始化在 Start 中初始化
在 Start 中初始化
伪代码表示:
1 | RotateY script = new RotateY() |
值类型
参数的类型,分为值类型、引用类型
值类型:如 int, float, bool
值类型(struct):如 Vector3, Color
引用类型(class):如 GameObject, Transform, MeshRenderer…
值类型
值类型的特点:
本身是一个值,可直接赋值
若未赋值,则默认为 0
不能为 null
1
public float speed = null ??
结构体 struct,也是值类型
所以,
若未赋值,则各字段值为 0
不能设为 null
1
Vector3 rotateSpeed = null ??
其实,在 C#里面,int, float 本质也是 struct 类型
string,原则上属于 class 类型
引用类型
参数也可以是引用类型。
- -节点,GameObject
- -组件,如 Transform、MeshRenderer、AudioSource
- -资源,如 Material、Texture、AudioClip、…
- -数组类型
练习:添加 TrainLogic,使小火车朝着目标运动
但是,有两个红旗目标。。
运行时调试
在游戏运行时,可以对物体/组件进行实时调试
显然,在运行模式下,所有参数不能保存到场景
保存参数的办法:
- -在 Play Mode 下,组件
Copy Component - -在 Edit Mode 下,组件
Paste Component Values
第 15 章 鼠标输入
鼠标输入
鼠标输入 相关 API :
1 | Input.GetMouseButtonDown() |
几个细节
1 区分 事件探测 VS 状态探测
鼠标事件,只触发一次
Input.GetMouseButtonDown()
Input.GetMouseButtonUp()
鼠标状态,表示当前是否正在被按下
Input.GetMouseButton()
2 鼠标事件是全局的,每个脚本 互不影响
屏幕坐标
Input.mousePosition
1 | if(Input.GetMouseButtonDown(0)) |
世界坐标与屏幕坐标转换
1 | // 一个物体,在屏幕上的位置 : |
键盘输入
获取键盘输入,相关 API :
Input.GetKeyDown(key) 按键事件,按下
Input.GetKeyUp(key) 按键事件, 抬起
Input.GetKey(key) 按键状态,是否正被按下
演示:当按下 W 键时,向前运动 。
键值常量,可参考官方文档:
KeyCode.A ,
KeyCode.Space ,
KeyCode.LeftArrow …
第 16 章 组件的访问
组件的调用
组件Component,代表一个功能。
例如,AudioSource可用于播放音乐、音效。。
其中,Play on Awake表示自动播放
在代码中,也可以用 API 来使其播放音乐。
获取 AudioSource 组件
1
AudioSource audio = GetComponent<AudioSource>();
播放
1
audio.Play();
其中,<>表示泛型,即获取
<AudioSource>类型的组件
1 | void Update() |
组件的参数
组件的参数,也可以在代码中访问。
例如,AudioClip,音频资源Mute,是否静音Loop,是否循环播放Volume,音量
1 | audio.mute = true; //设置静音 |
https://docs.unity3d.com/cn/2023.2/ScriptReference/AudioSource.html
引用别的组件
在主控脚本里面访问音频组件
第一种办法,
(1)添加一个变量,
1 | public GameObject bgmNode; |
然后在检查器里指定这个引用。
(2)访问节点下的组件,
1 | AudioSource audio = bgmNode.getComponent<AudioSource>(); |
第二种办法:(推荐)
直接添加一个变量,
1 | public AudioSource bgm; |
然后在检查器里指定这个引用 。自动找到背景音乐节点下面的 AudioSource 组件
引用脚本组件
一个脚本里,访问另一个脚本组件。
和普通组件一样,
API 获取
1
FanLogic fan = node.getComponent<FanLogic>();
直接引用
1
public FanLogic fan;
1 | // 目标组件,直接在检查里引用 |
消息调用
不推荐使用这种方法
消息调用SendMessage,以‘消息’的形式来调用另一个组件
1 | //找到目标节点 |
SendMessage的内部执行(反射机制):
- 找到 target 节点下的所有组件
- 在组件下寻找 methodName 这个函数
- 若存在此函数,则调用它
- 若不存在,则继续查找
- 若最终无法匹配,则报错
https://docs.unity3d.com/cn/2023.2/ScriptReference/Component.SendMessage.html
练习 简单飞控
练习,添加无人机,控制起降。
MainLogic.cs
1 | using System.Collections; |
RotateLogic.cs
1 | using System.Collections; |
FlyLogic.cs
1 | using System.Collections; |
第 17 章 物体的访问
获取物体
游戏物体GameObject,也可以叫节点
按 名称/路径 获取(不推荐),通过
Find()查找,名字变了就找不到了1
2
3
4
5
6
7//若不重名,可以按名称获取
GameObject node = GameObject.Find("旋翼");
//最好指定全路径
GameObject node = GameObject.Find("无人机/旋翼");
RotateLogic rotateLogic = node.GetComponent<RotateLogic>();
rotateLogic.DoRotate();引用获取,添加一个变量,在检查器中引用
1 | public GameObject wingNode; |
父子物体
场景中的层级关系/父子关系,是由 Transform 维持的。
查看文档,找到 Transform 类的说明
https://docs.unity3d.com/cn/2023.2/ScriptReference/Transform.html
- 获取父级
1 | //父级的Transform组件 |
- 获取子级
foreach遍历
1 | foreach (Transform child in transform) |
GetChild(),按索引获取
1 | Transform child = transform.GetChild(0); //第0个 |
transform.Find(),按名称查找子项,其中,二级子级应该制定路径,如 bb/cc
1 | Transform child = transform.Find("bb/cc"); |
物体的操作
- 设置新的父级
1 | transform.SetParent(other); |
- 设为一级节点
1 | transform.SetParent(null); |
其中,parent 为 null 表示一级节点(没有父级)
gameObject.SetActive(false)显示/隐藏
1 | Transform child = transform.Find("aa"); |
要点与细节
transform.Find("/222"),其中/表示在根下查找物体
练习 俄罗斯方块
练习,3D 版的俄罗斯方块,按空格键切换形状。
PlayerLogic.cs
1 | using System.Collections; |
第 18 章 资源的访问
资源的使用
在脚本中,也可以引用一个资源。
AudioClip,音频文件
Texture,纹理贴图
Material,材质 ……
演示:
准备音效文件,预览
添加脚本
MusicTest.cs- 添加变量
public AudioClip audioSuccess;
- 添加变量
引用音频资源
使用 API 播放音频
AudioSource.PlayOneShot(clip),用于播放音效
资源数组
在脚本中,也可以定义一个数组变量。
比如,一个音乐盒,存了多首歌曲。
1 | public AudioClip[] songs; |
练习,创建一个音乐盒,点鼠标随机切换
其中,
1 | int index = Random.Range(min, max); |
用于在[min,max)中随机抽取一个数,不含max
练习 三色球
练习,制作一个变换颜色的小球。
就是用脚本修改 Material 材质
1 | using System.Collections; |
第 19 章 定时调用
定时调用
定时调用Invoke*,即一般所谓的‘定时器’
继承自MonoBehaviour:
Invoke(func, delay),只调用一次InvokeRepeating(func, delay, interval),循环调用IsInvoking(func),是否正在调度中CancelInvoke(func),取消调用、从调度队列中移除
https://docs.unity3d.com/cn/2023.2/ScriptReference/MonoBehaviour.html
其中,func,函数名是一个字符串(反射机制)
定时与线程
InvokeRepeating 定时调用,并没有创建新的线程
Unity 引擎的核心是单线程的。
验证:
Start()、Update()、以及定时调用,是在同一个线程。
获取当前线程号,
1 | using System.Threading; |
https://docs.unity3d.com/cn/2023.2/Manual/ExecutionOrder.html
参考官方文档的说明。
- 消息函数
Awake/Start/Update/OnEnable. - 定时调用
Invoke - 协程调用
Coroutine
几点细节
重复的调用
每次InvokeRepeating,都会添加一个新的调度
演示:连续调用两次InvokeRepeating。取消调用
IsInvoking(func),判断 func 是否在 Invoke 队列CancelInvoke(func),取消 func 的 Invoke 调用CancelInvoke(),取消当前脚本的所有 Invoke 调用
1 | if (!IsInvoking(func)) |
练习 红绿灯
练习,做一个可以自动切换的红绿灯。
红灯,4 秒
绿灯,4 秒
黄灯,1 秒
LightLogic.cs
1 | using System.Collections; |
练习 加速减速
按鼠标实现风扇加速减速
FanLogic.cs
1 | using System.Collections; |
第 20 章 向量
向量
- Vector3 三位向量
API: 向量的长度
1 | Vector3 v = new Vector3(3, 0, 4); |
- 单位向量,即长度为 1 的向量。
例如,
1 | Vector3 v1 = new Vector3(1, 0, 0); |
- 标准化 Normalize
缩放一个向量,使其长度为 1, 例如,
(3, 4, 0) → (0.6, 0.8, 0)(2, 2, 0) → (0.707, 0.707, 0)(1, 0, 0) → (1, 0, 0)
API: 向量标准化
1 | Vector3 v1 = new Vector3(2, 2, 0); |
- 几个常量
Vector3.zero 即(0, 0, 0)Vector3.up 即(0, 1, 0)Vector3.right 即(1, 0, 0)Vector3.forward 即(0, 0, 1)
https://docs.unity3d.com/cn/2023.2/ScriptReference/Vector3.html
向量运算
- 加法
向量加法,即 x y z 三个分量分别相加
例如,
1 | Vector3 a = new Vector3(1, 3, 0); |

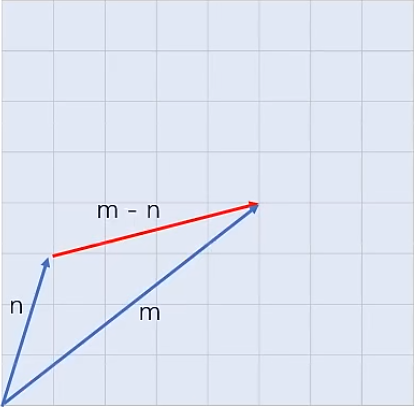
- 减法
向量加法,即 x y z 三个分量分别相减
例如,
1 | Vector3 m = new Vector3 (5, 4, 0); |
- 乘法
向量乘法,分为 3 种:
标量乘法
b = a * 2点积
c = Vector3.Dot(a, b)差积
c = Vector3.Cross(a, b)
其中,只要求掌握标量乘法,即对每一个分量相乘
- 赋值
Vectors3 是值类型,可以直接赋值
例如,
1 | Vector3 a = new Vector(1, 1, 0); |
不能设为 null,
1 | Vector3 speed = null; ?? |
向量测距
向量测距,用于求两物体间的距离
例如,
1 | Vector3 p1 = transform.position; /自己位置 |
1 | Vector3.Distance(a, b) //也可以求距离 |
https://docs.unity3d.com/cn/2023.2/ScriptReference/Vector3.Distance.html
物体间的距离,确切的说是轴心点之间的距离
应检查确认物体的轴心点。
向量的使用
Vector3 可以直接作为脚本的参数
1 | public Vector3 speed; |
第 21 章 预制体
预制体
预制体 Prefab,即预先制作好的物体
使用预制体,可以提高开发效率。
演示:导出 RacingCar 资源包。。
- 在 Prefabs 目录下,是预制体资源,
*.prefab - 用预制体来构造物体
使用预制体 Prefab,可以快速创建物体
在 Prefab 资源中,包含了的所有数据。
预制体的创建
预制体的创建:
- 先制作好一个样本节点
- 做好以后,直接拖到 Assets 窗口,则自动生成一个
*.prefab资源 - 原始物体不再需要,可以删除。
要点与细节
在导出 prefab 资源时,应该将依赖文件一并导出。
prefab 只是记录了节点的信息。
prefab 文件中不包含材质、贴图数据,仅包含引用
预制体的实例
Prefab Instance, 由预制体创建得到的对象
特征:
- 在 Hierarchy 中,节点图标不同
- 在 Hierarchy 中,右键菜单 | Prefab
- 在 Inspector 中,上下文工具 | Prefab
Prefab Instance 和原 Prefab 之间存在关联。
右键菜单 Prefab | Unpack,则解除关联,成为普通物体
预制体的编辑
*.prefab相当于是一个模板,可以再次编辑
第 1 种方式:单独编辑
- 双击 Prefab,进入 单独编辑 模式
- 编辑节点和组件
- 退出,完成编辑
第 2 种方式:原位编辑
- 选择 Prefab Instance
- 在检查器中 Open
- Context:显示:Normal / Gray / Hidden
- 此时,仅选中的物体被编辑,其余物体是陪衬
- 编辑节点
- 退出,完成编辑
第 3 种方式:覆盖编辑
- 选择 Prefab Instance
- 直接在场景中编辑
- 编辑完后
- Overrides | Apply, 应用编辑
- Overrides | Revert, 取消编辑
要点与细节
- 点 Unpack 之后,可断开与原始 Prefab 间的联系
多级节点
Prefab 中,多级节点 / 父子关系,也是常见的情况
第 22 章 动态创建实例
动态创建实例
创建 Prefab 之后,用 API 动态创建实例
API:
1 | Object.Instantiate(original, parent) |
https://docs.unity3d.com/cn/2023.2/ScriptReference/Object.Instantiate.html
演示:
准备子弹 prefab,参考
制作演示添加火控脚本 FireLogic
添加变量
public GameObject bulletPrefab;克隆实例
1
2
3GameObject node = Instantiate(bulletPrefab, null);
node.transform.position = Vector3.zero;
node.transform.localEulerAngles = Vector3.zero;
在检查器中,引用子弹的 prefab
运行游戏
在 3D 视图中,观察创建出来的实例。
实例的初始化
创建 Prefab Instance 之后,应做初始化:
parent, 父节点:子弹树 Bullut Folderposition / localPosition, 位置:fire pointeulerAngles / localEulerAngles, 旋转:与炮管一致Script, 自带的控制脚本
要点与细节
(1)一般引用 Transform,而 GameObject 是没有存在感的
(2)可以使用空物体,标记一个空间坐标
实例的销毁
一般的,创建实例之后,也要负责销毁。
对于子弹来说,
- 当飞出屏幕时,销毁
- 按 射程 / 飞行时间
- 当击中目标时,销毁
Object.Destroy(obj), 用于销毁一个实例
在本轮帧更新Update()之后,执行销毁
https://docs.unity3d.com/cn/2023.2/ScriptReference/Object.Destroy.html
要点与细节
- 区分以下两种写法:
Destroy(this.gameObject)Destroy(this)错误 Destroy()不会立即执行,而是在本轮 Update 之后才执行
练习 火控参数
练习 火控参数的完善
MainLogic.cs
1 | using System.Collections; |
FireLogic.cs
1 | using System.Collections; |
BulletLogic.cs
1 | using System.Collections; |
练习 按键控制
练习,添加按键控制,旋转炮塔的方向。
FireLogic.cs
1 | using System.Collections; |
第 23 章 物理系统
物理系统
物理系统 Physics,即由物理规律起作用的系统
确切地说,是 牛顿运动定律 (力,质量,速度)
刚体组件 Rigidbody,物理学中的物体
- 给‘苹果’添加 Rigidbody 组件
Physics|Rigidbody - 运行游戏
此时,牛顿接管了这个物体,在重力作用下使其运动
物理碰撞
物理系统,不仅接管了刚体的运动,也接管了碰撞。
演示:添加一个 小球 物体,添加 Rigidbody。
碰撞体 Collider,描述了物体的碰撞范围。
其中,Box Collider,长方碰撞体Sphere Collider,球形碰撞体
碰撞体的范围:
反弹与摩擦
刚体的反弹与摩擦,也归物理系统负责。
演示:
- 新建
Physici Material,添加给小球的Collider - 设置
Friction、Bounciness - 观察小球的反弹。
第 24 章 碰撞检测
运动学刚体
运动学刚体 Kinematic ,即质量为 0 的刚体
由于质量为 0,所以此刚体不受牛顿约束。

此时,需要用脚本使其运动。
演示:添加 SimpleLogic 脚本,让小球运动。
碰撞检测
对于运动学刚体,也支持碰撞检测。
由 物理引擎 负责检测。
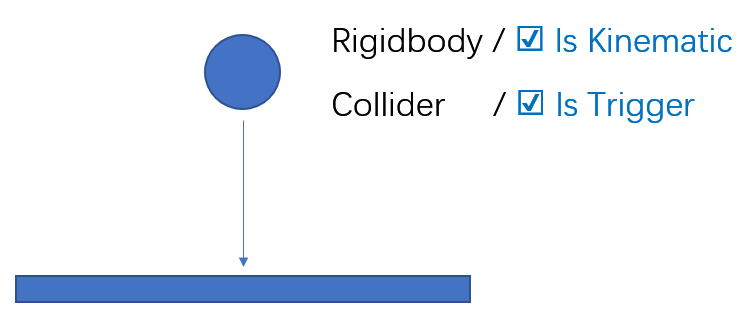
演示:
- Rigidbody ☑ Is Kinematic
- Collider ☑ Is Trigger 触发器
- 挂一个脚本,添加消息函数
1 | void OnTriggerEnter(Collider other) |
其中,
Collider other ,表示对方的碰撞体
other.gameObject ,对方节点
other.name ,对方节点的名字
要点与细节
- 物理引擎只负责探测 ( Trigger ) ,不会阻止物体或者反弹
- 物体引擎计算的是 Collider 之间的碰撞,和物体自身形状无关
- 当检测到碰撞时,会调用当前节点 的脚本中的 OnTriggerEnter 消息
碰撞体的编辑
碰撞体 Collider 的形状,规定了碰撞的边界。
其形状是可以编辑的,
Box Collider,盒形Sphere Collider,球形
Box Collider ,盒形
Center中心位置,相当于物体的轴心点Size长宽高
点 Edit Collider ,可以直接编辑 绿色框。
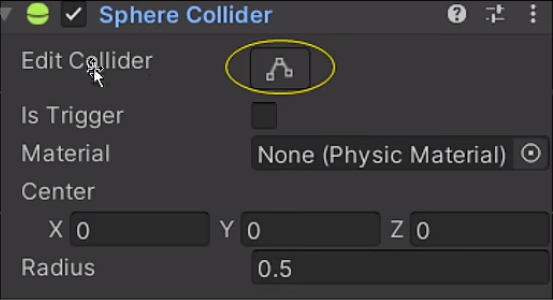
Sphere Collider ,球形
Center中心位置,相当于物体的轴心点Radius半径大小
点 Edit Collider ,可以直接编辑 绿色框。
练习:添加子弹物体 。。。
检查原先有没有碰撞体,如果有,则先移除
根据体型,选择合适形状的碰撞体
此处,添加一个 Box Collider
编辑碰撞体,调整边界
一般无需调整,自动创建合适的尺寸。
练习 击毁目标
练习,发射一发子弹,击毁目标。
运动学刚体 Rigidbody / Is Kinematic
触发器模式 Collider / Is Trigger
消息函数 void OnTriggerEnter()
1 | using System.Collections; |
要点与细节
碰撞的双方,只需一方设置为运动学刚体即可
第 25 章 游戏项目实例
射击游戏
制作一个射击游戏。
海空背景
玩家
子弹,无限数量
怪兽,蛇皮走位,无限数量
子弹特效,爆炸特效
背景音乐
添加角色
添加两个角色。玩家,敌人。
天空盒
天空盒 Skybox ,即游戏的背景。
Window | Rendering | Lighting ,光照设置
Environment | Skybox Material ,天空盒材质
子弹和碰撞
添加子弹。
添加子弹脚本。
添加碰撞检测。
注意,怪兽是一个空物体,其碰撞体要手工编辑
连续发射
- 子弹
增加自毁时间
lifetime把子弹做成
prefab
- 玩家
定义发射点
fire point定义子弹目录
bullet folder使用定时器,子弹连发
按键控制
添加按键控制,让玩家左右移动。
怪兽的走位
给怪兽添加控制脚本 EnemyLogic
怪兽生成器
添加怪兽生成器,定时生成怪兽。
子弹特效
添加子弹特效。粒子特效 Particle System
注意,修改之后要应用 Prefab
爆炸特效
添加爆炸特效。粒子特效 Particle System
在击中目标时,创建特效节点。
MainLogic.cs
1 | using System.Collections; |
BulletLogic.cs
1 | using System.Collections; |
PlayerLogic.cs
1 | using System.Collections; |
EnemyLogic.cs
1 | using System.Collections; |
EnemyCreator.cs
1 | using System.Collections; |